April 26, 2010

If you are thinking take out food...3

Get osashimi from Pacific Mercantile in downtown. Albacore, squid, or uni would be great. At home, we can prepare some okazu, rice and miso soup. We have organic tamari for osashimi in the fridge.
Ex. Ika no Osashimi (squid)

Also makizushi & inarizushi are good snacks for me (and you.) Yum yum:)

April 25, 2010

Shrimp Broth


I usually make shrimp broth whenever I make shrimp for dinner. Save the heads for yummness.

Ingredients:
  • shrimp heads (depends on how many shrimp you used.)
  • water
Recipes:


  1. At medium heat, warm a small pot. (I usually use pots for miso soup.)
  2. Put shrimp heads in the pot.
  3. Make them change their colors.
  4. Add water.
  5. Once you see a layer like pics, collect them with a ladle, and throw out in the sink.
  6. Keep doing it for 30min. If boiling too much, lower the heat.
  7.  Keep throwing away the layer.
  8. After 30min, turn off the heat, and cool it down.
  9. Use a mesh separator, pour the broth in a tupperware. 


I like using the shrimp broth for miso soup. すっごくおいしいよ。

April 24, 2010

How to Prepare Frozen Shrimp

We buy wild caught shrimp with head still on (flavor is better than headless, I think.) Usually Hmart sells it on sale so as you know we always buy extra and froze them. I will tell you how to prepare those frozen shrimp.

  1. Put frozen shrimp the amount you use in a bowl in the kitchen sink.
  2. Keep pouring fresh water in the bowl gently for 10min.
  3. Usually frozen shrimp should be melted pretty quickly in the water.
  4. Once shrimp is soft enough, you can peel the shell.
  5. Break head off and put it in another bowl.
  6. Then pull up the tail toward head and break it off first. (When you do this step, a gray string looking inside of shrimp is coming off with the tails. That's the part we don't wanna eat. If eat, you might feel eating like sands. Yuck. If it wouldn't come off with a tail, use a toothpick and stab it on the back body after peeling shells, then move the toothpick up breaking the part. You probably can pull the gray part out. Maybe I should make a video for this. It's hard to explain in English.)
  7. Break legs off.
  8. Then peel and break the body shell off.
  9. Wash it with water and ready to use.
Trash legs, tails and shells, but save the heads for making shrimp broth. You can use shrimp broth for miso soup and risotto or more.

それと、ゴミはちゃんとその日のうちに捨ててね。くさくなっちゃうから。

April 23, 2010

Shishamo


Ingredient:
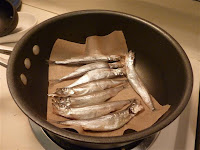
  • shishamo (We buy mezashi style like the picture below. They are connected through their mouths by a straw.)
Recipe:
  1. Defrost shishamo (I usually put them in the fridge night before I cook.)
  2. Cut parchment paper right size of your pan and put it in the pan.
  3. Take shishamo out of plastic.
  4. Put them on the parchment paper and put lid on.
  5. Turn on high heat first and after you hear sounds of grilling, make heat low.(It's probably about 5 min for high heat.)
  6. Keep grilling about 13min. It should be ready to eat. If you want more brown, make shishamo up side down and grill 5 more minutes.


Dekiagari! できあがり! 

I remember you asked me when you had shishamo first time. "Are you gonna eat head,too?" "I kinda feel bad to eat eggs." Now, shishamo is one of your favorite? Mmmm, I say, "Not!" but I know you still like shishamo. I just don't see the speed yet, the speed of when you are eating your favorites.

April 22, 2010

Natto Gohan


Ingredients:
  • steamed white rice
  • natto (I personally prefer kotsubu=small sized or hikiwari=minced natto.)
  • soy sauce (our soy sauce is organic.)
Recipe:
  1. Open a natto packet. (it should be dissolved when you are ready to eat. we usually buy frozen one.)
  2. Trash a liquid sauce and mustard came with natto. It contains high fructose corn syrup.
  3. Move the plastic on the natto on to the top cover so it is less messy.
  4. Stir the natto with chopsticks in the plastic packet. Do it parallel to the bottom. If you push down and stir, you just make a hole in the bottom. Stir at least 30 times.
  5. Serve warm steamed rice for 1 in a medium size bowl.
  6. Put the well mixed natto on the rice.
  7. Pour 1ts soy sauce on the natto.
  8. Mix well when you eat, and after the first bite, adjust flavor with more soy sauce.
  9. Simple is the best though, mayonnaise, tororo, minced ginger, thin sliced green onion, or sesame seeds are great toppings. I had this with mayonnaise a couple days ago for my lunch. 

Dekiagari! 出来上がり!


ぐるぐるかきまぜて食べるのがスキ。子供のころ、おばあちゃんが「納豆3つぶ食べると1年長生きする」ってよく言ってた。それだけ納豆は栄養満点なんだよ。だからがんばってスプーン3口くらいは食べてね。

April 21, 2010

If you are thinking take out food...2

L&L is great.


Kalua pork, chicken katsu, laulau, locomoco...!
Anything else except spam is fine for me. I wish they were closer from us. The best thing is that we can go to Hawaii again;)

April 20, 2010

Tuna Tomato Cream Pasta

 Ingredients:

・1 big tomato (if small, use 2 like that picture)
・1~2 big clove of garlic
・1 can of tuna (usually we use tuna in spring water)
・2 table spoon olive oil
・1 table spoon sake (if we don't have sake, use white wine instead.)
・1/3 table spoon of tomato ketchup
・black pepper&salt appropriate amount for adjustment (maybe 3~4pinches, do taste check at each pinch.)
・2.5 oz heavy cream
・whole wheat pasta for you and me. (ex. fusilli, penne)

Recipe:

1. Peel the tomato skin, how to peel↓
(put it in the boiling water for a couple min, after that put it in the iced water, then peel the skin with fingers.)
2. Cut the tomato diced, chop the garlic minced, get rid of water from the tuna can
3. Warm the pan at the medium heat, pour olive oil, and add chopped garlic
4. After you smell aroma from the garlic, add the diced cut tomato and make it boiled a little bit
5. Add pepper&salt (a couple pinches each as a starter), add sake, ketchup, tuna
6. Add heavy cream and stir.
7. Lower the heat, keep stirring about 5 min.
8. Mix with your favorite al dente pasta (we usually use whole wheat penne)
9. Taste check and add salt if needed.


Dekiagari! 出来上がり!


This is your favorite pasta so I'm sure your future kids would love it as well:) You would probably fight with them like who gets left over. 次はもっとたくさん作ろうね。いつもおかわりするとき、もうないって残念がるから。

April 19, 2010

If you are thinking take out food... 1

KOKORO is fine.


Get gyu-don super size with ginger for me. Don't forget using their coupon if we have. Also I like their chickenkatsu and kara-age. Hint, hint!
Oh, and we do have their point card, Arigato card.

たまに食べるよね、こういうのも。食べたいよね。
でも、これだけじゃ体に悪すぎるから、ちゃんとサラダか野菜の
おかずも作ってね。

April 18, 2010

Ume no Onigiri = Ume no Omusubi


Ingredients:
  • steamed white rice
  • nori seaweed (I personally like using Korean's for onigiri but Japanese Yaki nori is fine. )
  • umeboshi (pickled plum: we have either organic umeboshi that Huge bought for us or my grandma's umeboshi made from scratch that every summer she makes. )
  • plastic wrap
  • a small rice bowl or miso soup bowl


Recipe:


  1. Prepare everything you need. Be ready.
  2. Cut plastic wrap an enough size and put it on a bowl.
  3.  Put white rice on the bowl and make it cool until you can hold it(about 2min). Don't get burn.
  4. Put umeboshi in the middle.
  5. Close and gather the plastic wrap and make it a ball.
  6. Make it harder with both hands and move the ball to one same direction in your hands.(Maybe 3~4times)
  7. At this point, you probably have a triangle-ish shape rice ball.
  8. Open the plastic wrap and put nori seaweed on it.
  9. Put nori seaweed on the other side as well.
  10. Make nori seaweed stick with rice.


Dekiagari! 出来上がり!

This is so simple but so good with miso soup and make it as great breakfast, lunch, snack, or even dinner. Also onigiri is a common obento. You know, I usually make onigiri in the morning and take it with me to school. AND, I make it for you for lunch as well. You tend to forget to eat though. Peanut butter toasts always win:(  Anyway, if you can make onigiri for our kids for breakfast in the future, it is a great energy food for a great start!

April 17, 2010

Gratin with Shrimp and Broccoli


Ingredients: We use organics, natural, grass fed,and wild caught food!


  • 10~20 Shrimps
  • 1 head of broccoli
  • 1 small onion
  • whole wheat short pasta like penne for 2
  • butter 50g 
  • cake flour 50g
  • whole milk 600ml
  • consomme 2~5g
  • 1 tbs olive oil
  • salt for flavor adjustment
  • black pepper for flavor adjustment
  • parmesan cheese your favorite amount (usually amount covers the pan we use)
Recipe

First, make white sauce. Then, saute shrimp and broccoli. Finally, boil pasta, mix all of them, and put them in an oven.


<white sauce>
  1. Cut onion and slice paper thin.
  2. Warm a pan with medium high and melt butter. (5 at our kitchen)
  3. Before the butter is melted all the way, put sliced onion in the pan.
  4. Stir constantly because we don't want brown or burned onion.
  5. Once the onion looks clear, turn off the heat, and put cake flour.
  6. Keep stirring and mix well.
  7. Pour whole milk and mix well.
  8. Pour consomme and mix well.
  9. Turn on the mideum heat again.
  10. Keep stirring until the liquid turns to thick. Watch out at this point, easy to get burn.
  11. Once it's thick, add salt and pepper to flavor, and turn off the heat.
<pasta> *While you are boiling water, cut veggies and cook them.
  1. Boil water and add 1ts salt.
  2. Once the water is boiling, add whole wheat pasta.
  3. Boil the pasta for 1~2min less than what the pasta package says.
<Shrimp and Broccoli> *Turn on the oven at 375F.
  1. Cut broccoli with bite size.
  2. Cut garlic minced.
  3. Using kitchen paper and get rid of water on shrimp.
  4. Put 1 tbs olive oil on a pan, and warm it at the medium heat.
  5. Add minced garlic. Once you smell the aroma, add shrimp and broccoli.
  6. Add salt and pepper 1 pinch each.
  7. Turn off heat once shrimp is cooked.
Bake in the oven!
  1. Use a large enough size of pyrex, and rub butter on it.
  2. Mix boiled pasta and cooked shrimp&broccoli in the pyrex.
  3. Adjust the flavor for the white sauce with salt and pepper and pour it on 2.
  4. Mix3. a little bit.
  5. Cover 4. with parmesan cheese. (I like a lot of cheese.)
  6. Bake for 20min first and if its color is not golden brown, bake more.
Dekiagari! 出来上がり!

This is one of Japanese kid's favorites so you can be a cool papa if you can make it:)